> ## Documentation Index
> Fetch the complete documentation index at: https://help.skillsdb.com/llms.txt
> Use this file to discover all available pages before exploring further.
# Azure Entra ID SSO Setup
> Configure SAML 2.0 Single Sign-On between Microsoft Entra ID (Azure AD) and SkillsDB, including the enterprise application, SAML endpoints, attribute claims, and identity provider metadata exchange.
**Quick Summary:** Set up SAML 2.0 Single Sign-On between Microsoft Entra ID and SkillsDB by creating an Entra enterprise application, exchanging SAML endpoint URLs with SkillsDB Support, configuring the required attribute claims (`NameID`, `firstName`, `lastName`), and providing your App Federation Metadata URL back to SkillsDB.
## Overview
This guide walks Microsoft Entra ID (Azure AD) administrators through the steps required to integrate SkillsDB with their organization's identity provider via SAML 2.0 Single Sign-On (SSO). Once configured, users can sign in to SkillsDB using their existing corporate credentials — without a separate SkillsDB password.
Setup is a two-way exchange between two parties:
* **SkillsDB Support** provides the SAML endpoint URLs (Identifier, Reply URL, and Sign on URL) that the customer must paste into the Entra enterprise application.
* **The customer** creates the Entra enterprise application, configures SAML, and returns either the App Federation Metadata URL (preferred) or, if that is not available, an x509 certificate plus the IdP SSO URL and IdP Entity ID.
SSO handles authentication only — it confirms who the user is at sign-in time. It does not create, update, or deactivate SkillsDB user accounts. To automate account lifecycle alongside SSO, configure [SCIM provisioning](/identity-and-provisioning/scim-setup) as well. Most customers configure both.
This guide covers the Microsoft Entra ID setup path. If you use a different identity provider (such as Okta, OneLogin, or Google Workspace), the SAML concepts are the same but the UI steps differ — contact [SkillsDB Support](https://www.skillsdb.com/support) for guidance.
## Prerequisites
Before you begin, make sure you have:
* **Permission level**: Microsoft Entra administrator access with permission to create enterprise applications
* **Setup requirement**: A Tenant URL and Secret Token request initiated with [SkillsDB Support](https://www.skillsdb.com/support) — Support will deliver the SAML endpoint URLs in a shared file once the request is processed
* **Access requirement**: The Microsoft Entra admin center at **Identity > Applications > Enterprise applications**
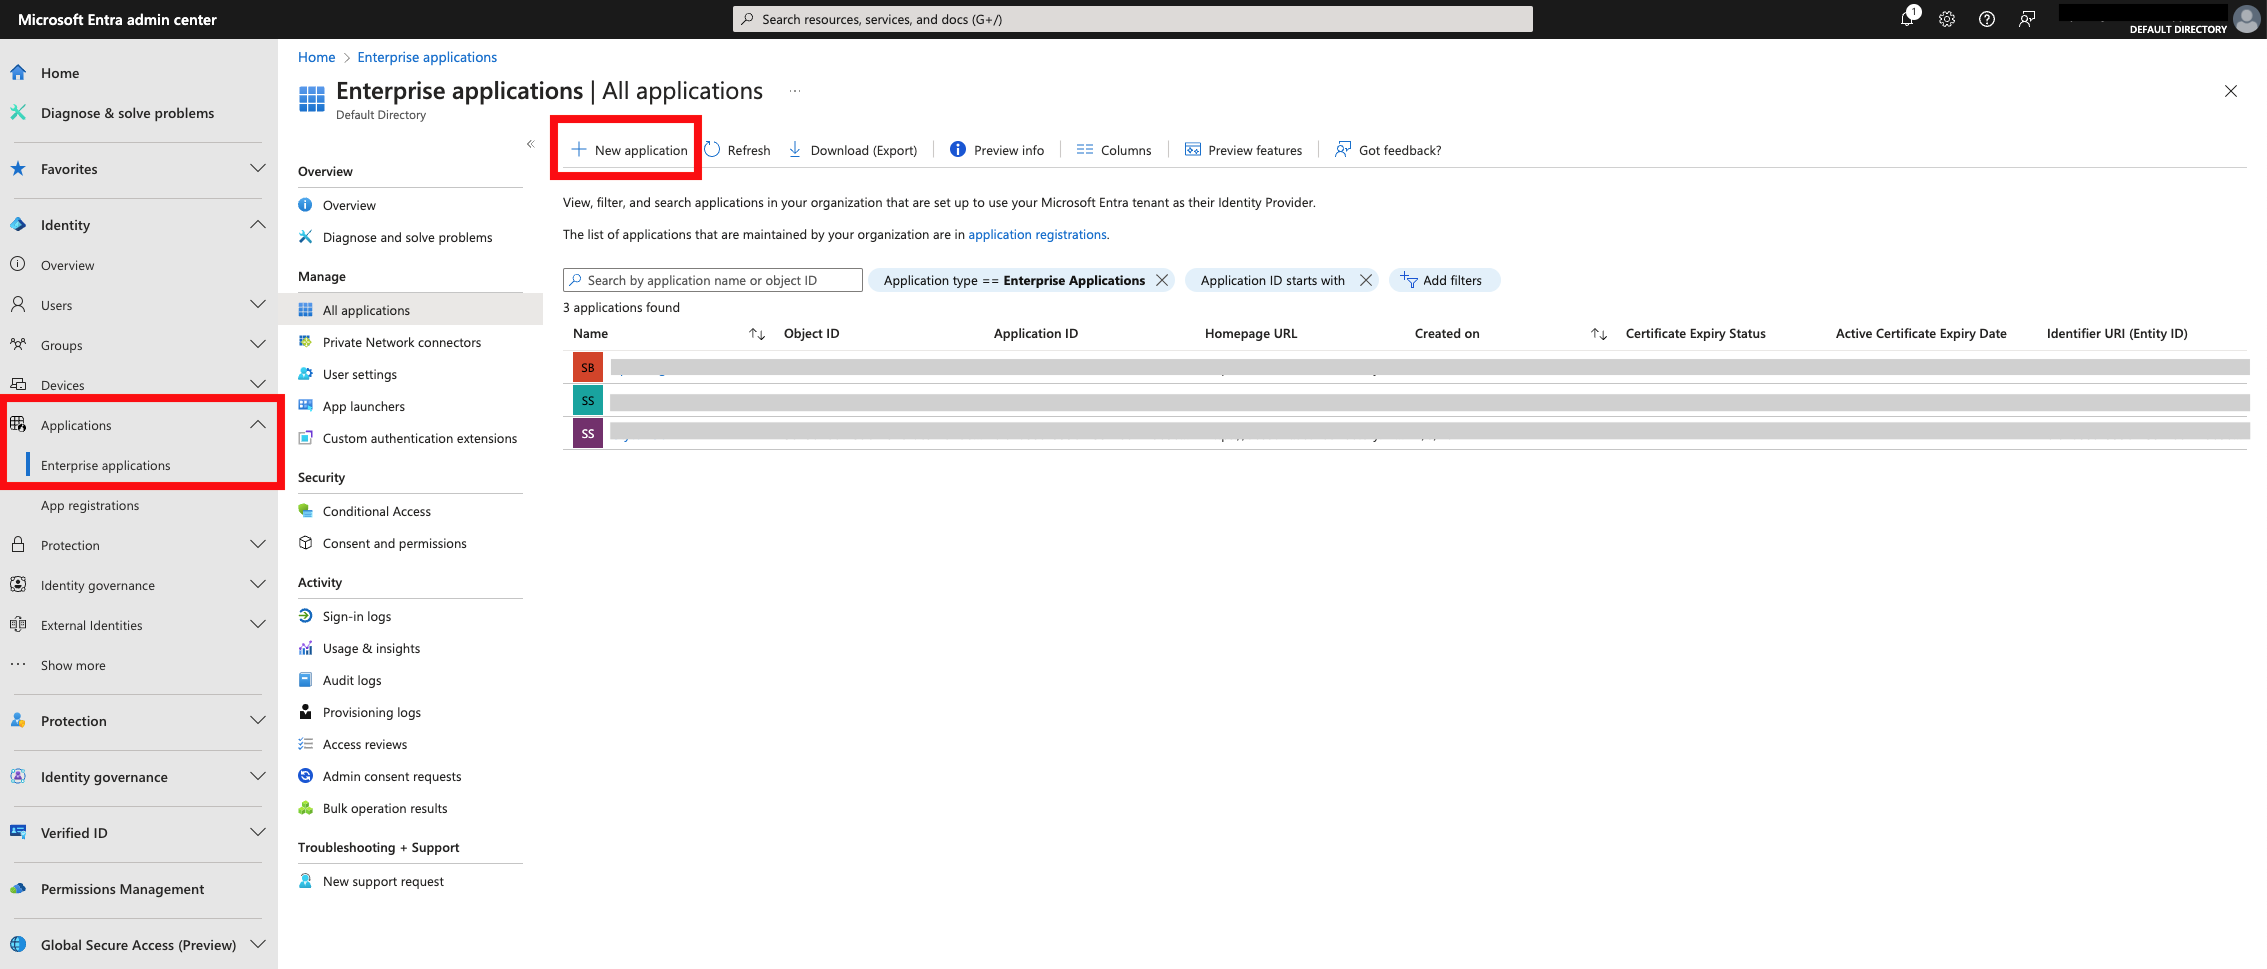
## How to create the Entra enterprise application
Log in to the **Microsoft Entra admin center**, navigate to **Enterprise applications**, and select **+ New application**.
Select **+ Create your own application** at the top of the application gallery.
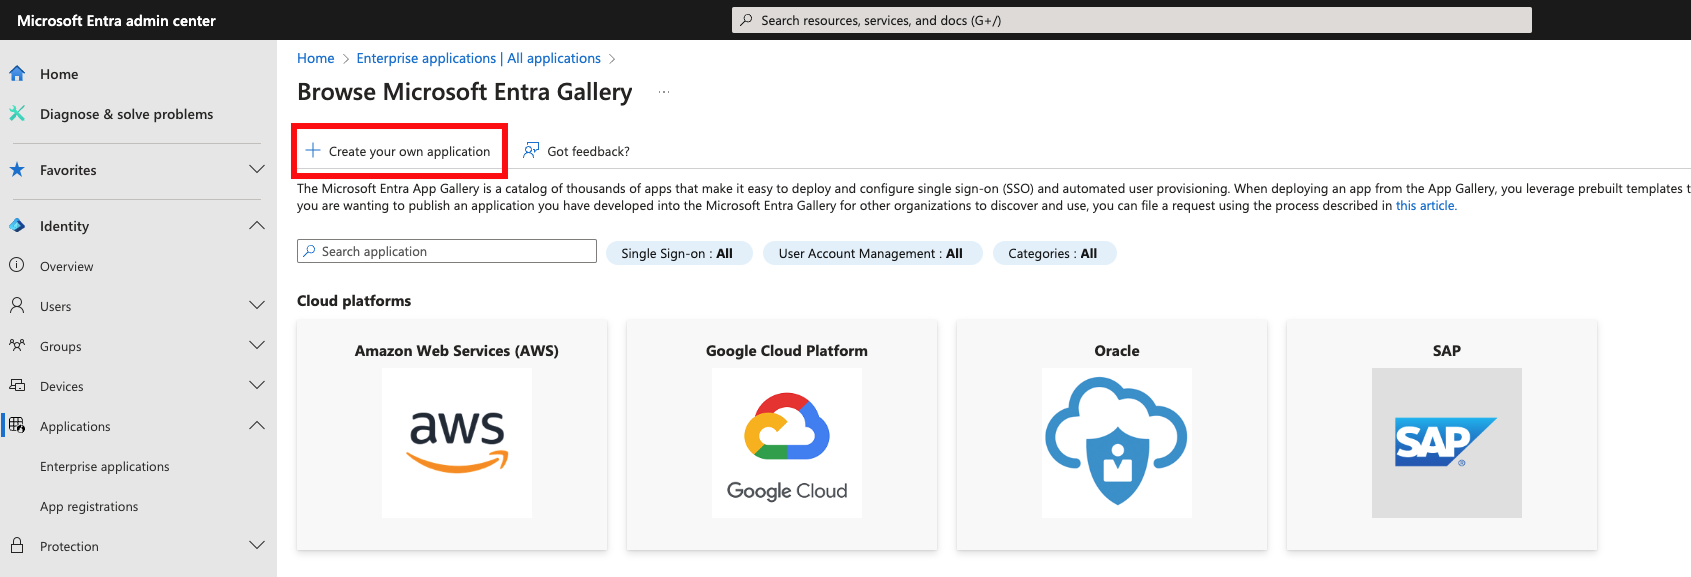
Enter a name for the application (for example, `SkillsDB`), select **Integrate any other application you don't find in the gallery (Non-gallery)**, and select **Create**.
On the application's overview page, navigate to **Single sign-on** and select **SAML**.
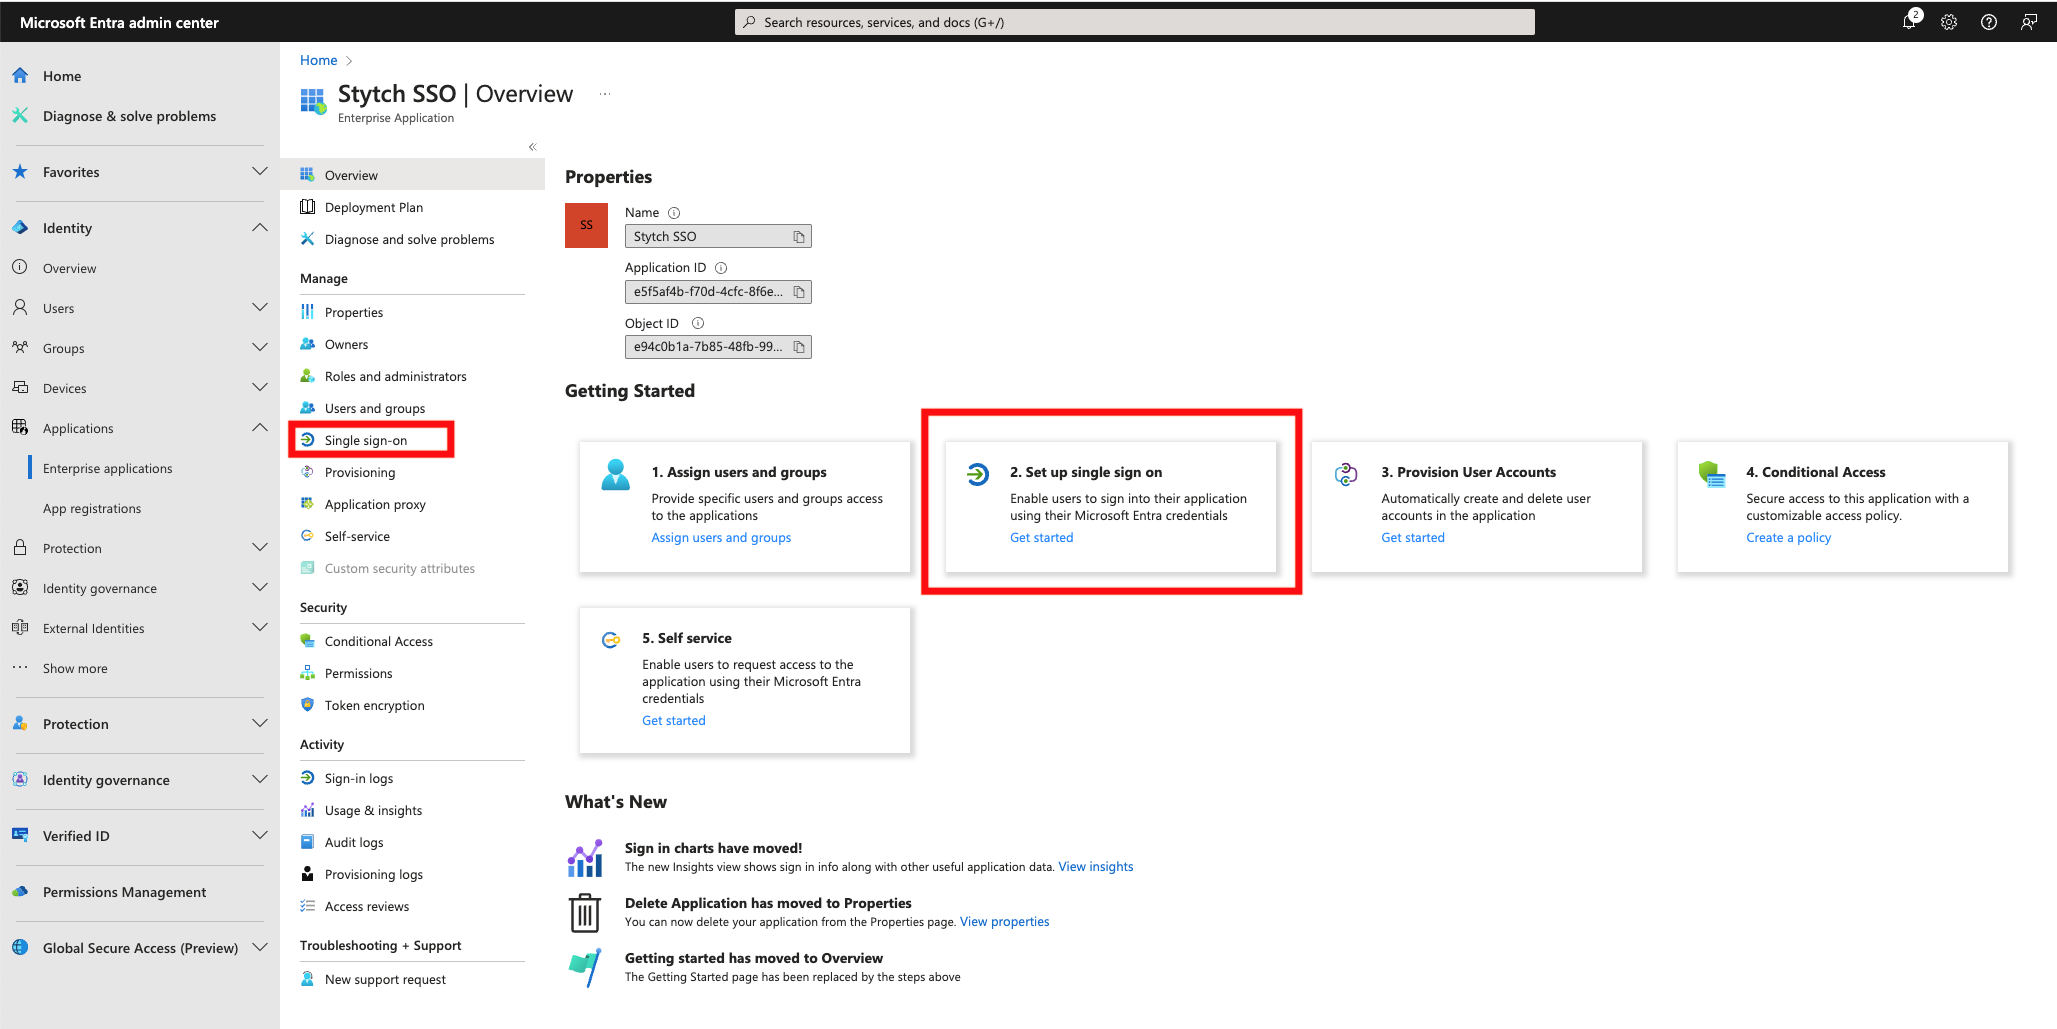
The enterprise application is now ready to receive SAML configuration values from SkillsDB.
## How SkillsDB shares the SAML endpoint URLs
SkillsDB Support delivers the SAML endpoint URLs to your IT team in a text file. The file is uploaded to Google Drive and shared with the email addresses you provide; a link is also sent over email.
The file contains three URLs in this format:
```text theme={null}
Identifier (Entity ID) & Reply URL (Assertion Consumer Service URL):
https://login.skillsdb.com/v1/b2b/sso/callback/{connection_id}
Sign on URL:
https://login.skillsdb.com/v1/public/sso/start?connection_id={connection_id}&public_token={public_token}
```
**Note:** Test environments use `https://test.stytch.com/*` rather than `https://login.skillsdb.com/*`. SkillsDB Support will send the correct values for your environment.
## How to configure SAML in the enterprise application
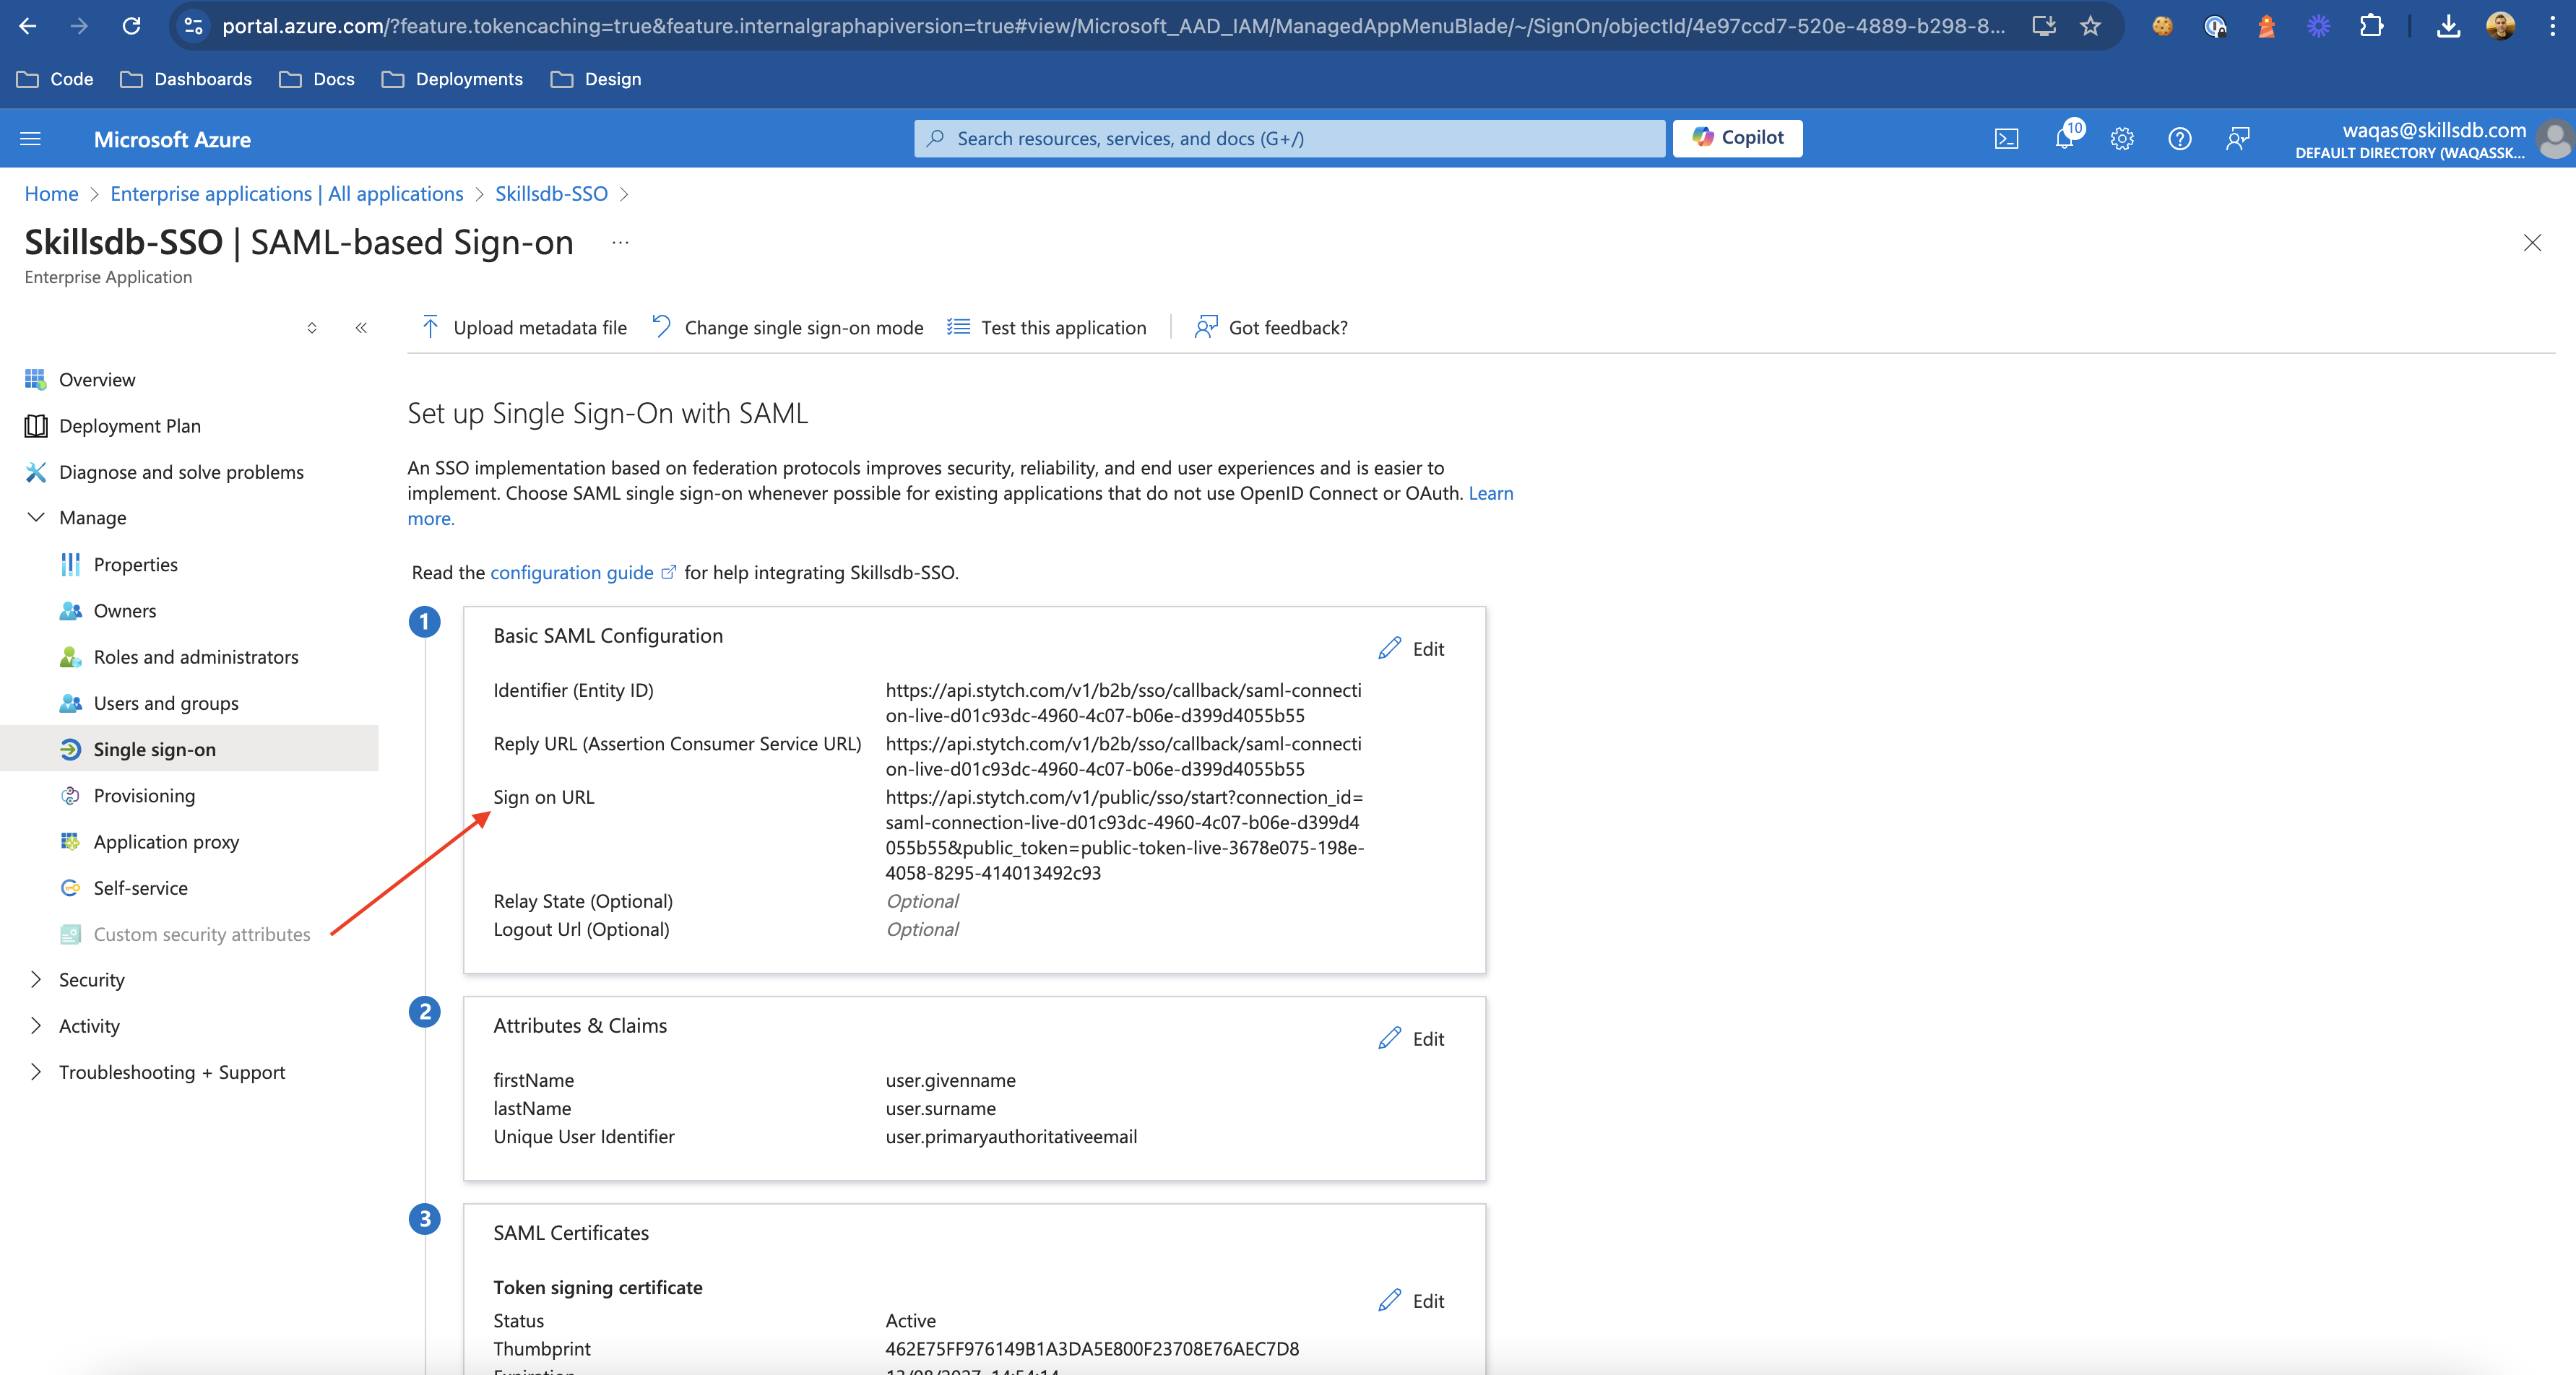
With the URLs from SkillsDB Support in hand, configure the **Basic SAML Configuration** section of your enterprise application.
On the **Single sign-on** page of your enterprise application, select **Edit** on the **Basic SAML Configuration** card.
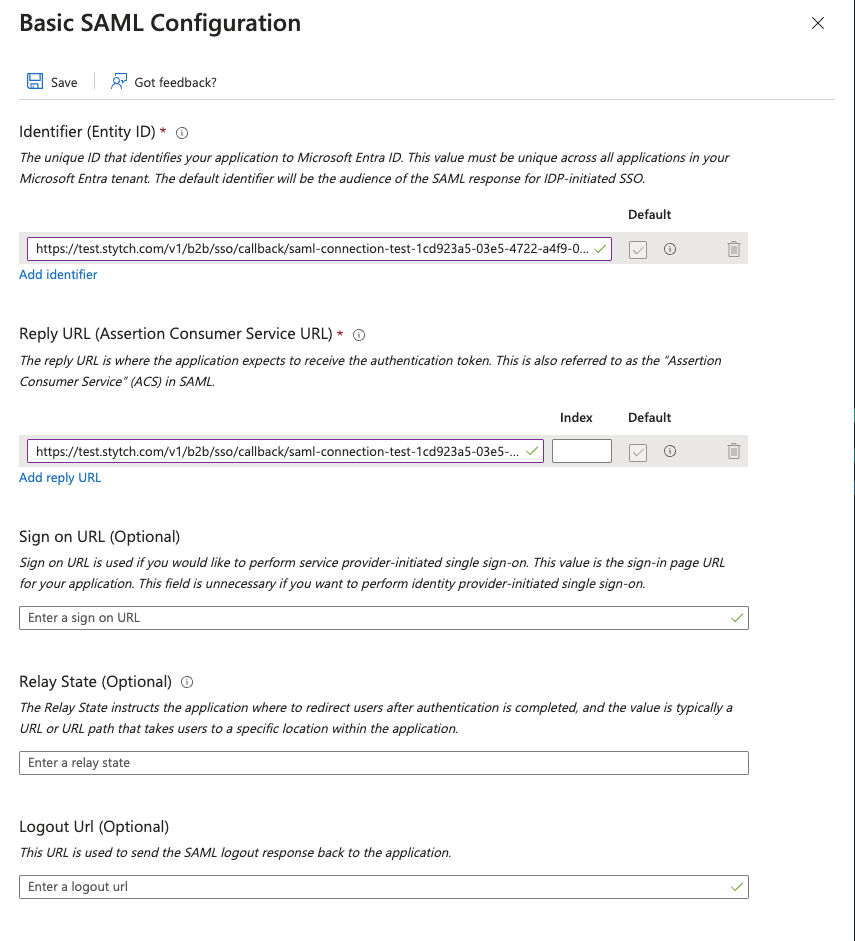
Paste the values from the SkillsDB-provided file into the corresponding fields:
* **Identifier (Entity ID)** — the SkillsDB callback URL
* **Reply URL (Assertion Consumer Service URL)** — the same SkillsDB callback URL
* **Sign on URL** — the SkillsDB sign-on URL
Leave all other fields blank.
Select **Save**.
## How to configure attributes and claims
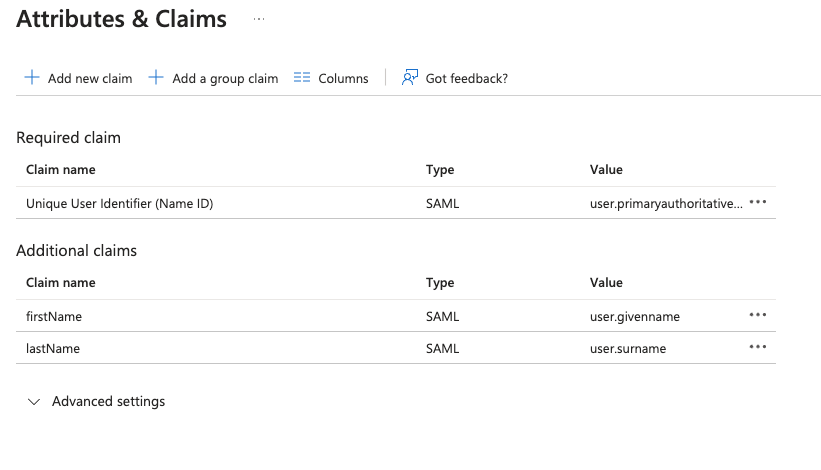
SkillsDB requires three SAML claims to identify and create users: a unique email identifier (`NameID`), `firstName`, and `lastName`.
On the **Single sign-on** page, select **Edit** on the **Attributes & Claims** card.
Under **Required claim**, select **Unique User Identifier (Name ID)** and change the **Source attribute** to `user.primaryauthoritativeemail`.
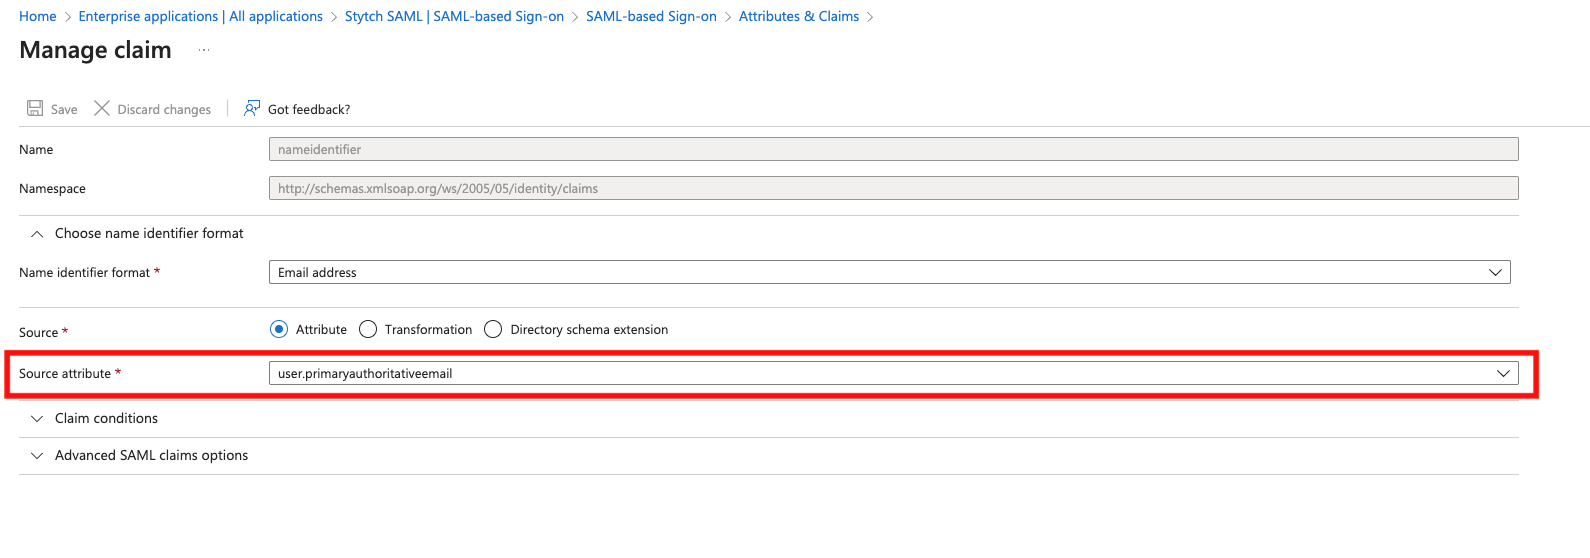
Under **Additional claims**, delete the default options and add two claims:
| Claim name | Source attribute |
| ----------- | ---------------- |
| `firstName` | `user.givenname` |
| `lastName` | `user.surname` |
Save the changes.
These three claims are required. The final claim mapping that SkillsDB stores on its side is:
```json theme={null}
{
"email": "NameID",
"first_name": "firstName",
"last_name": "lastName"
}
```
### Adding optional custom attributes
If your organization needs to send additional attributes (for example, `Department` or `JobTitle`), add them in the same **Attributes & Claims** window:
1. Select **+ Add new claim**
2. Enter a **Name** for the claim (for example, `Department`)
3. Set the **Source attribute** to the corresponding Entra ID user property
4. Save
After adding any custom claims, send the exact claim **Names** to SkillsDB Support so they can extend the mapping on the SkillsDB side.
## How to provide identity provider metadata to SkillsDB
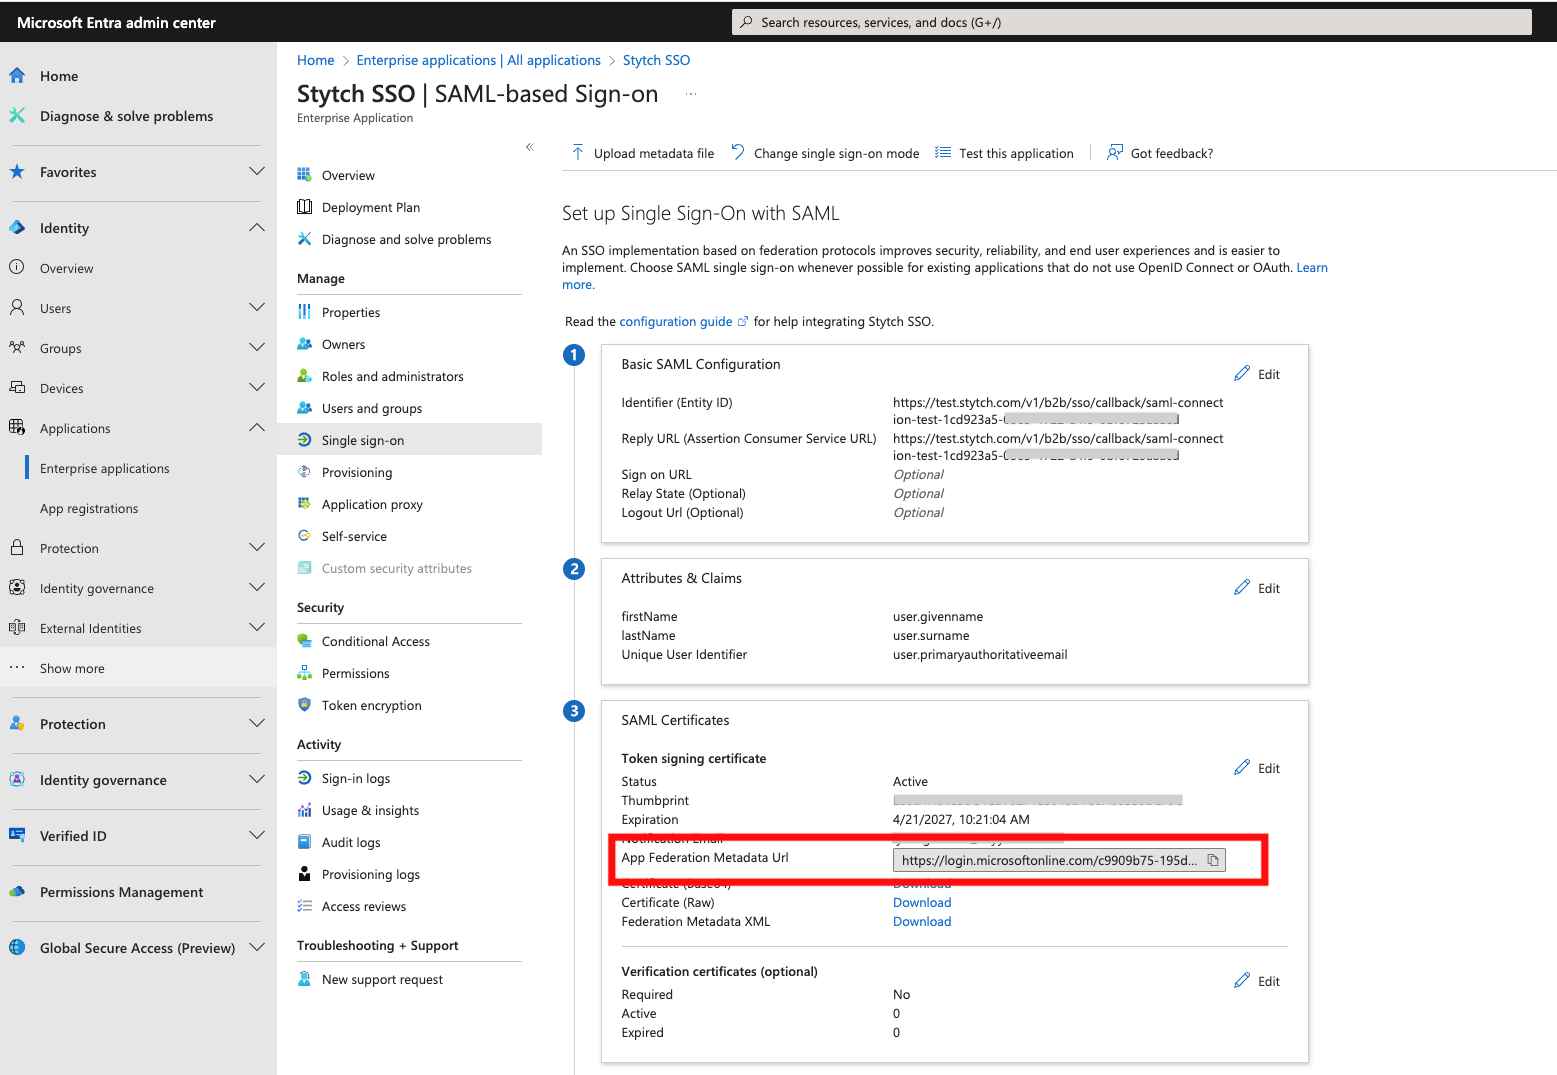
After SAML is configured, SkillsDB needs your identity provider's metadata to verify SAML assertions. There are two ways to deliver this — the **App Federation Metadata URL** is strongly preferred.
### Option 1: App Federation Metadata URL (preferred)
The App Federation Metadata URL is auto-rotating and self-contained. Use this option whenever it is available.
On the **Single sign-on** page, scroll to the **SAML Certificates** section and copy the **App Federation Metadata Url**.
The URL has this shape:
```text theme={null}
https://login.microsoftonline.com/{ID}/federationmetadata/2007-06/federationmetadata.xml?appid={appId}
```
Place the URL in a text file and share it with SkillsDB personnel through one of:
* A shared OneDrive or Google Drive link
* A Google Meet or Microsoft Teams chat message
SkillsDB Support adds the metadata URL to your Stytch configuration along with the standard claim mapping.
**Tip:** Use the App Federation Metadata URL whenever it is available. Because it is fetched dynamically, certificate rotations on the Microsoft side propagate without any action on your part or SkillsDB's.
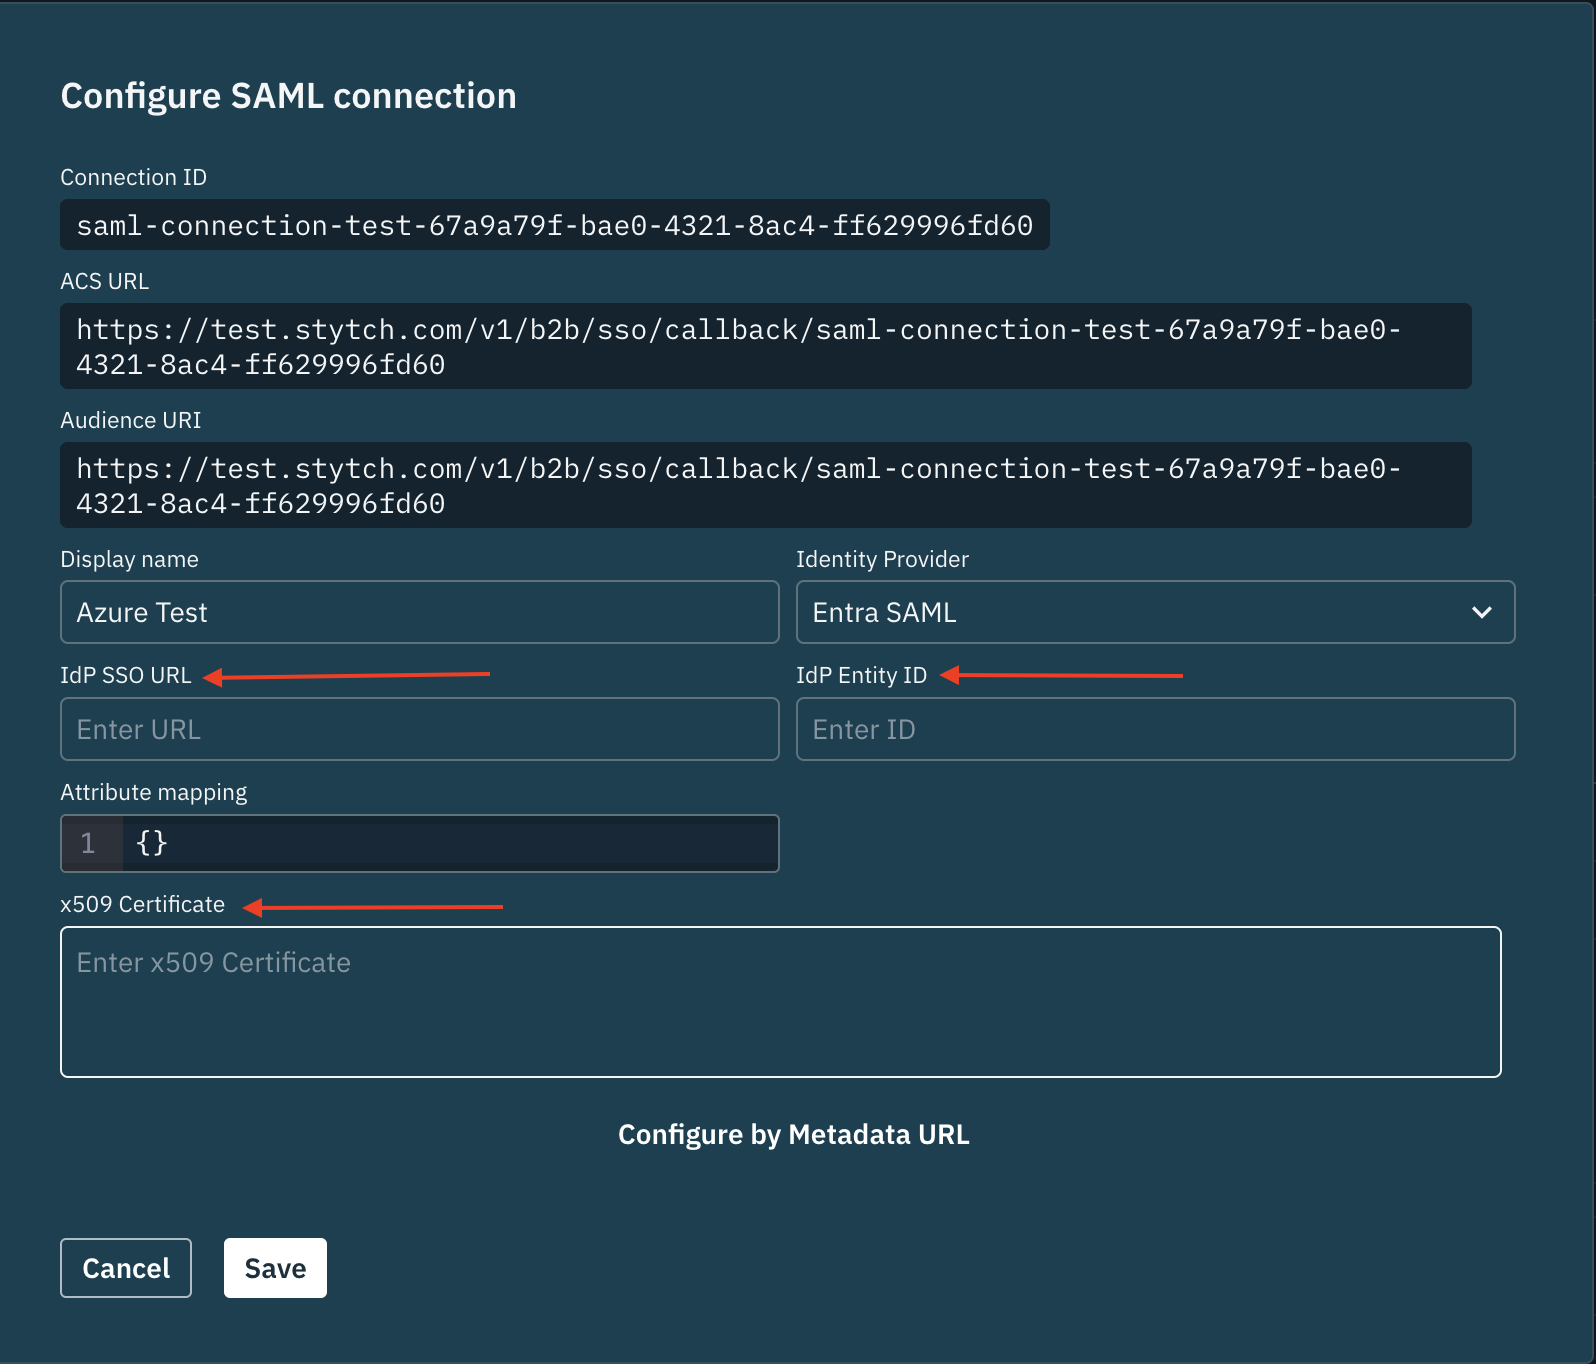
### Option 2: x509 certificate (alternative)
Use this option only if your environment cannot expose the App Federation Metadata URL. The customer must provide:
* The **x509 certificate** as an encrypted file
* The **IdP SSO URL**
* The **IdP Entity ID**
Encrypt the x509 certificate before sending it to SkillsDB. SkillsDB recommends 7-Zip with a password — exchange the password verbally over a meeting, never alongside the file.
**Warning:** Never transmit the x509 certificate without encryption, and never share the encryption password in the same channel as the file. The x509 certificate identifies your tenant to SkillsDB — anyone in possession of it could impersonate your identity provider.
Once SkillsDB Support decrypts the file, they apply it to your Stytch configuration along with the IdP SSO URL and IdP Entity ID.
## How to assign users to the application
Assigning users to the enterprise application controls who can sign in to SkillsDB through SSO.
On the enterprise application's overview page, select **Users and groups** from the left sidebar.
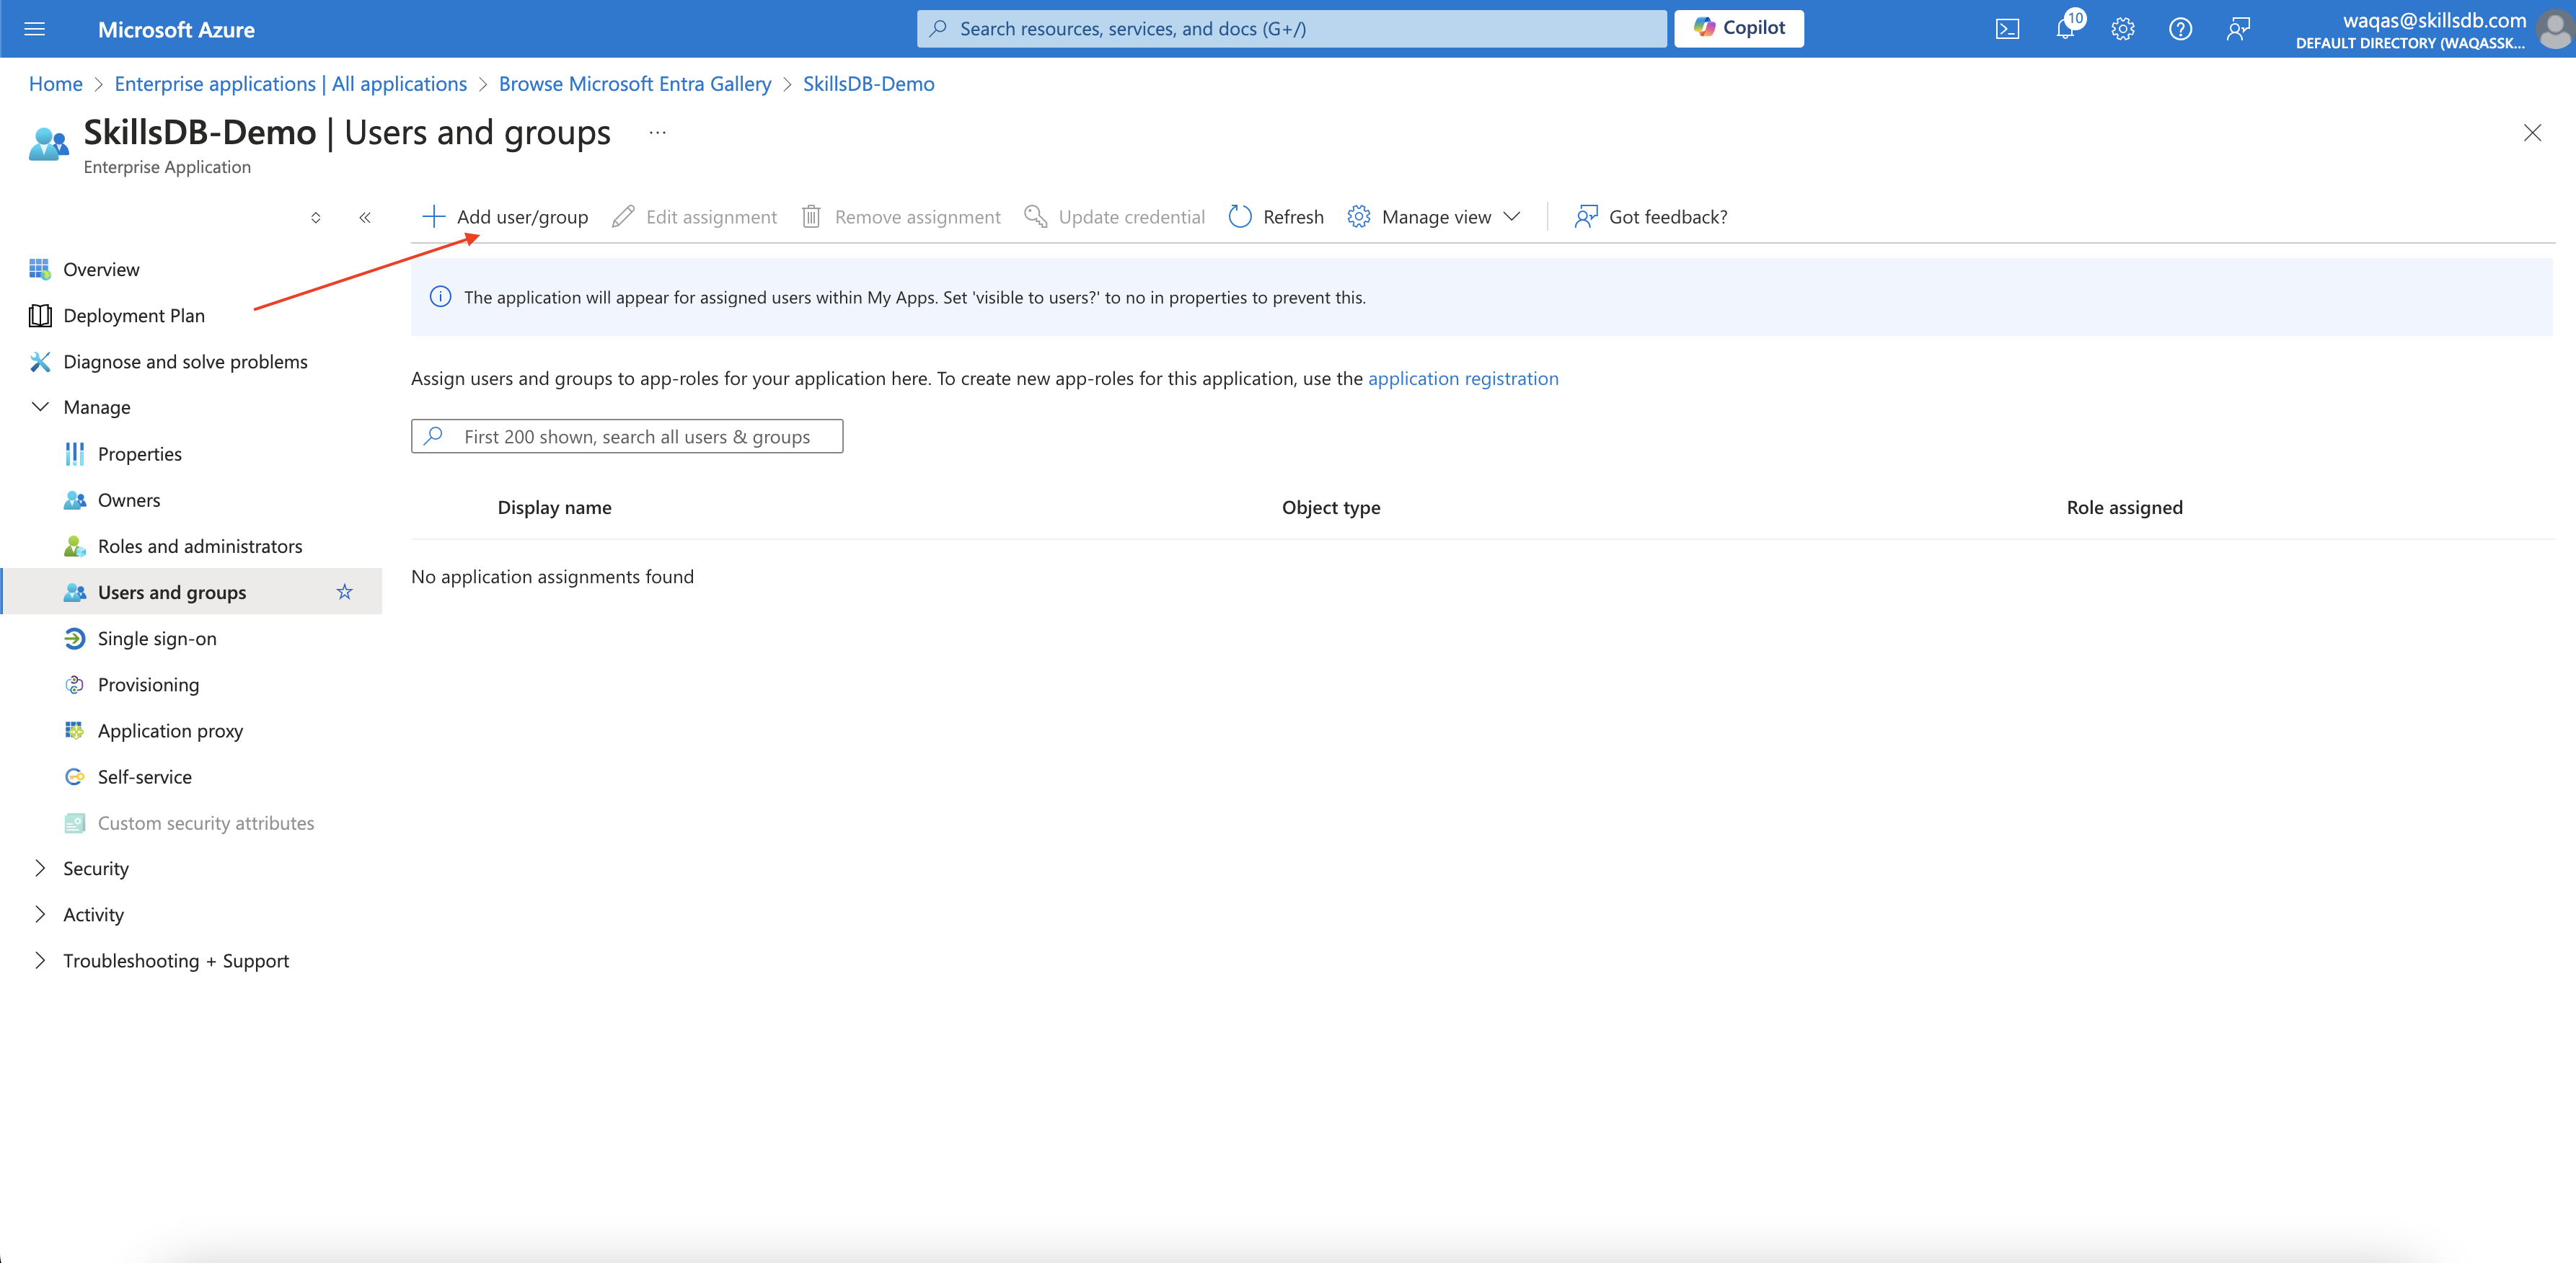
Select **+ Add user/group**, choose the users or groups that should have access, and confirm the assignment.
Only users assigned to the application — directly or through an assigned group — can sign in to SkillsDB via SSO.
## How to test the SSO connection
After the metadata URL or x509 certificate is in place on the SkillsDB side, any user signed in to their Microsoft organization account can test the integration in three ways.
### Direct Sign on URL
Open the **Sign on URL** that SkillsDB Support provided. The URL routes the user through Entra and back into SkillsDB.
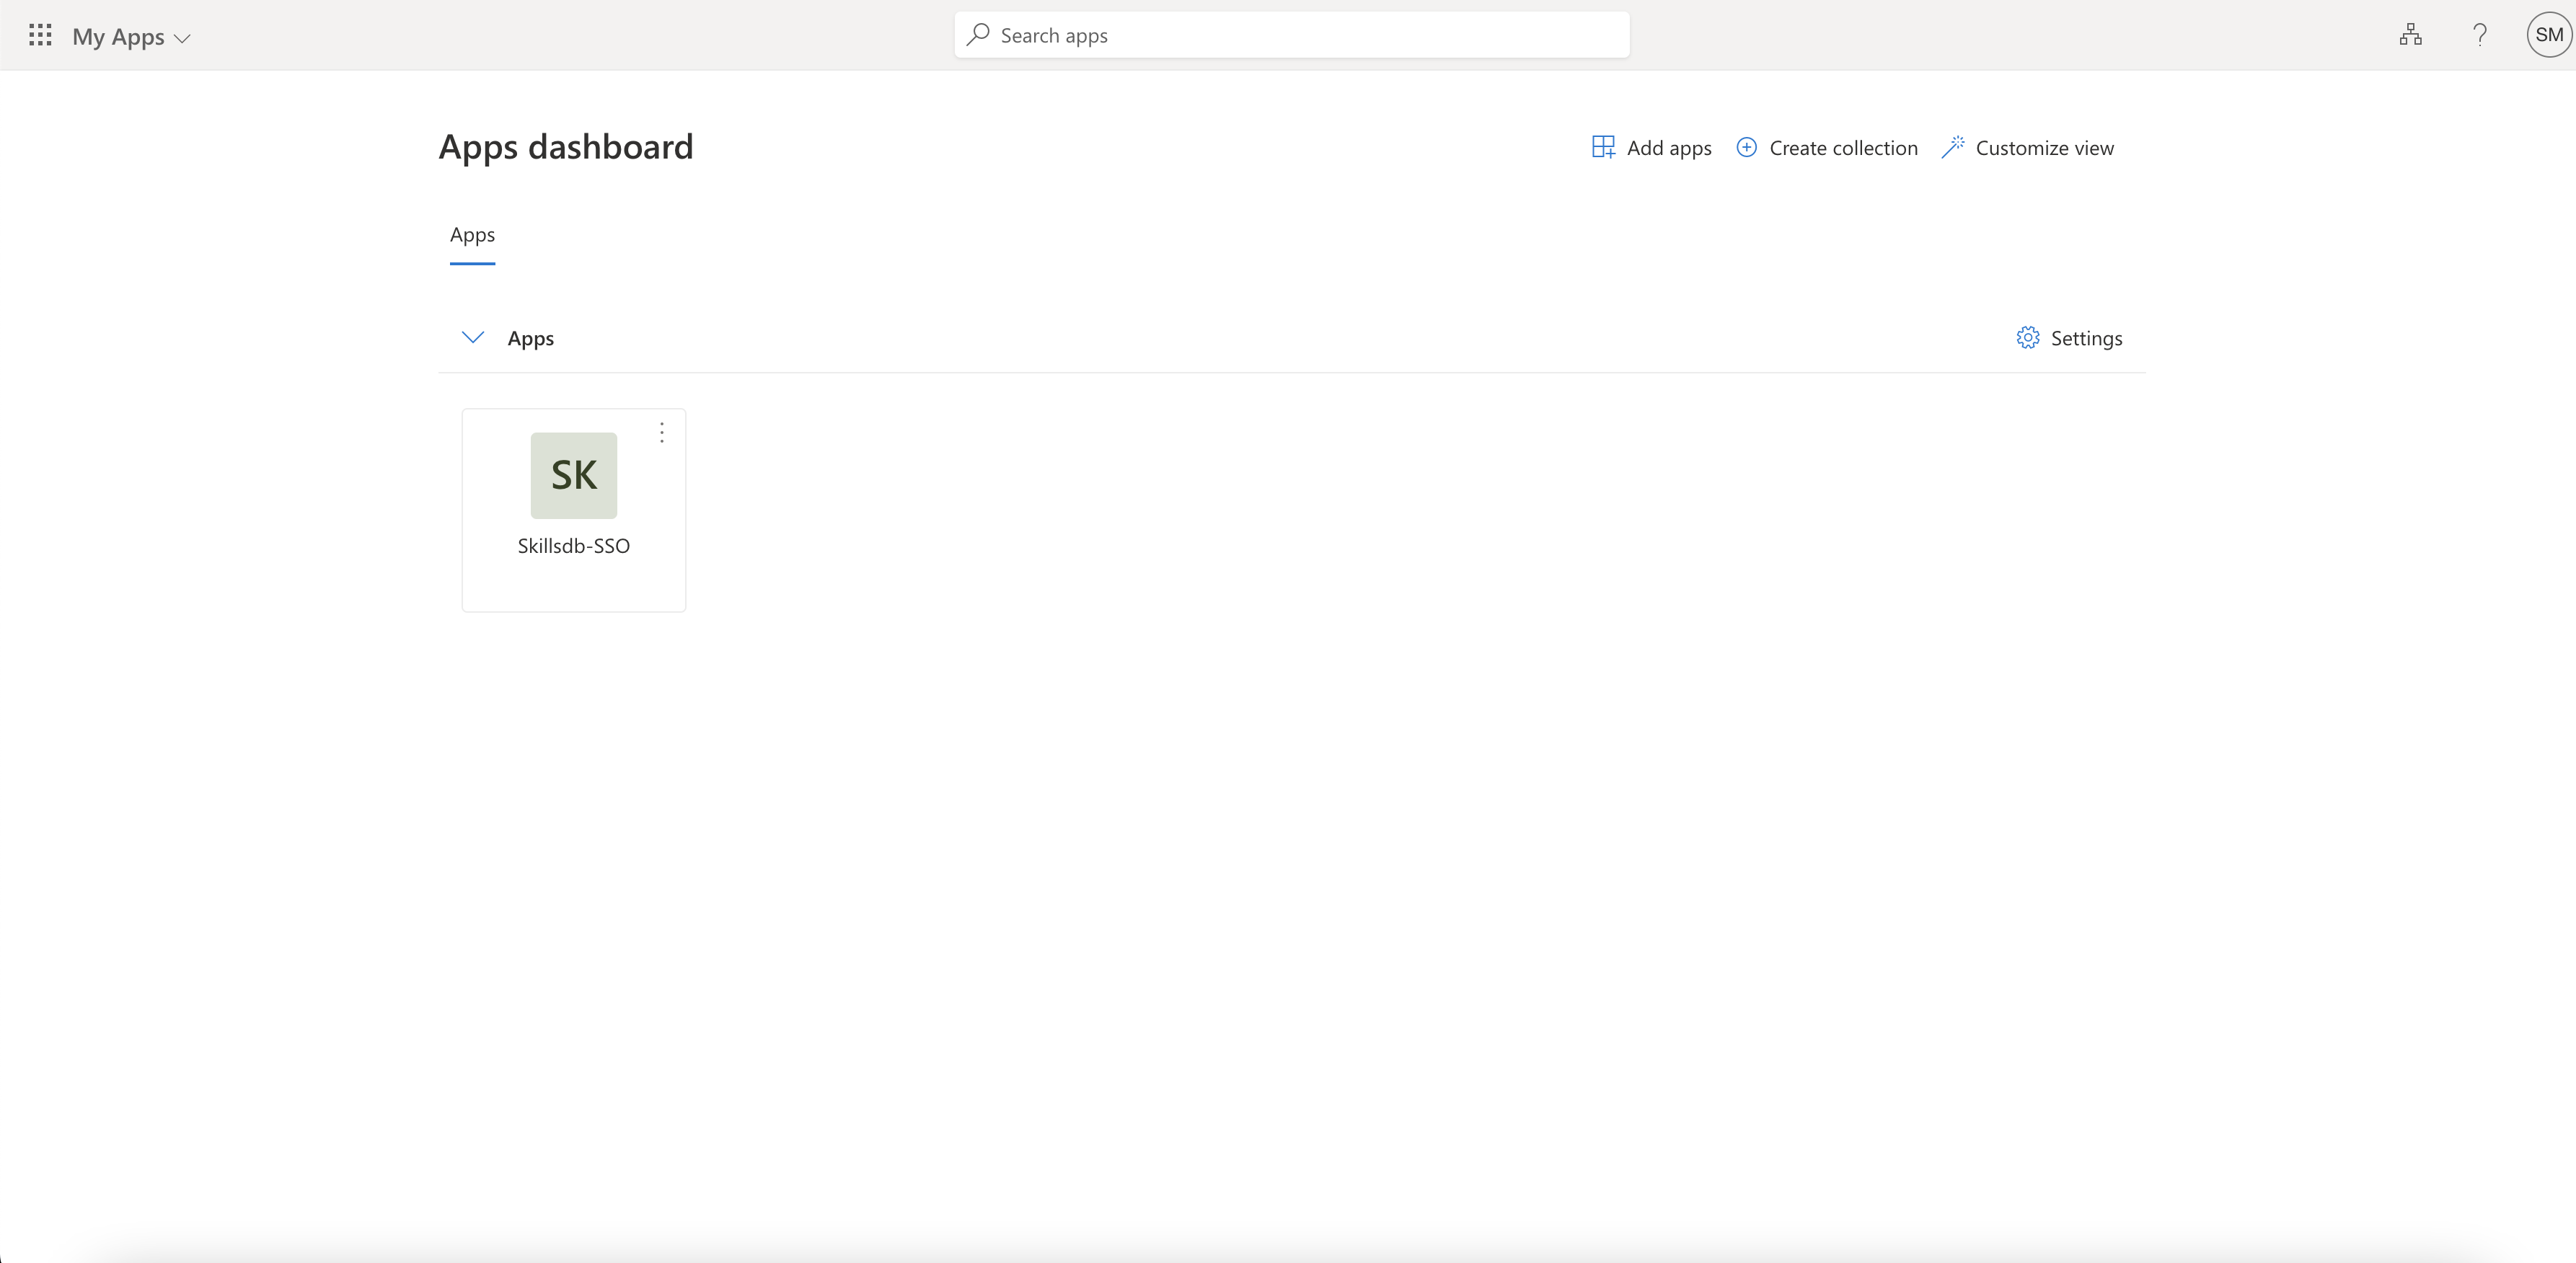
### Microsoft My Apps portal
Navigate to [https://myapplications.microsoft.com/](https://myapplications.microsoft.com/) and select the SkillsDB enterprise application tile.
### Test from the Azure portal
An administrator already provisioned in SkillsDB can validate the connection from the Entra application itself:
1. On the application's **Single sign-on** page, select **Test**
2. Choose **Sign in as current user** to verify your own session, or **Sign in as someone else** to test on behalf of another user
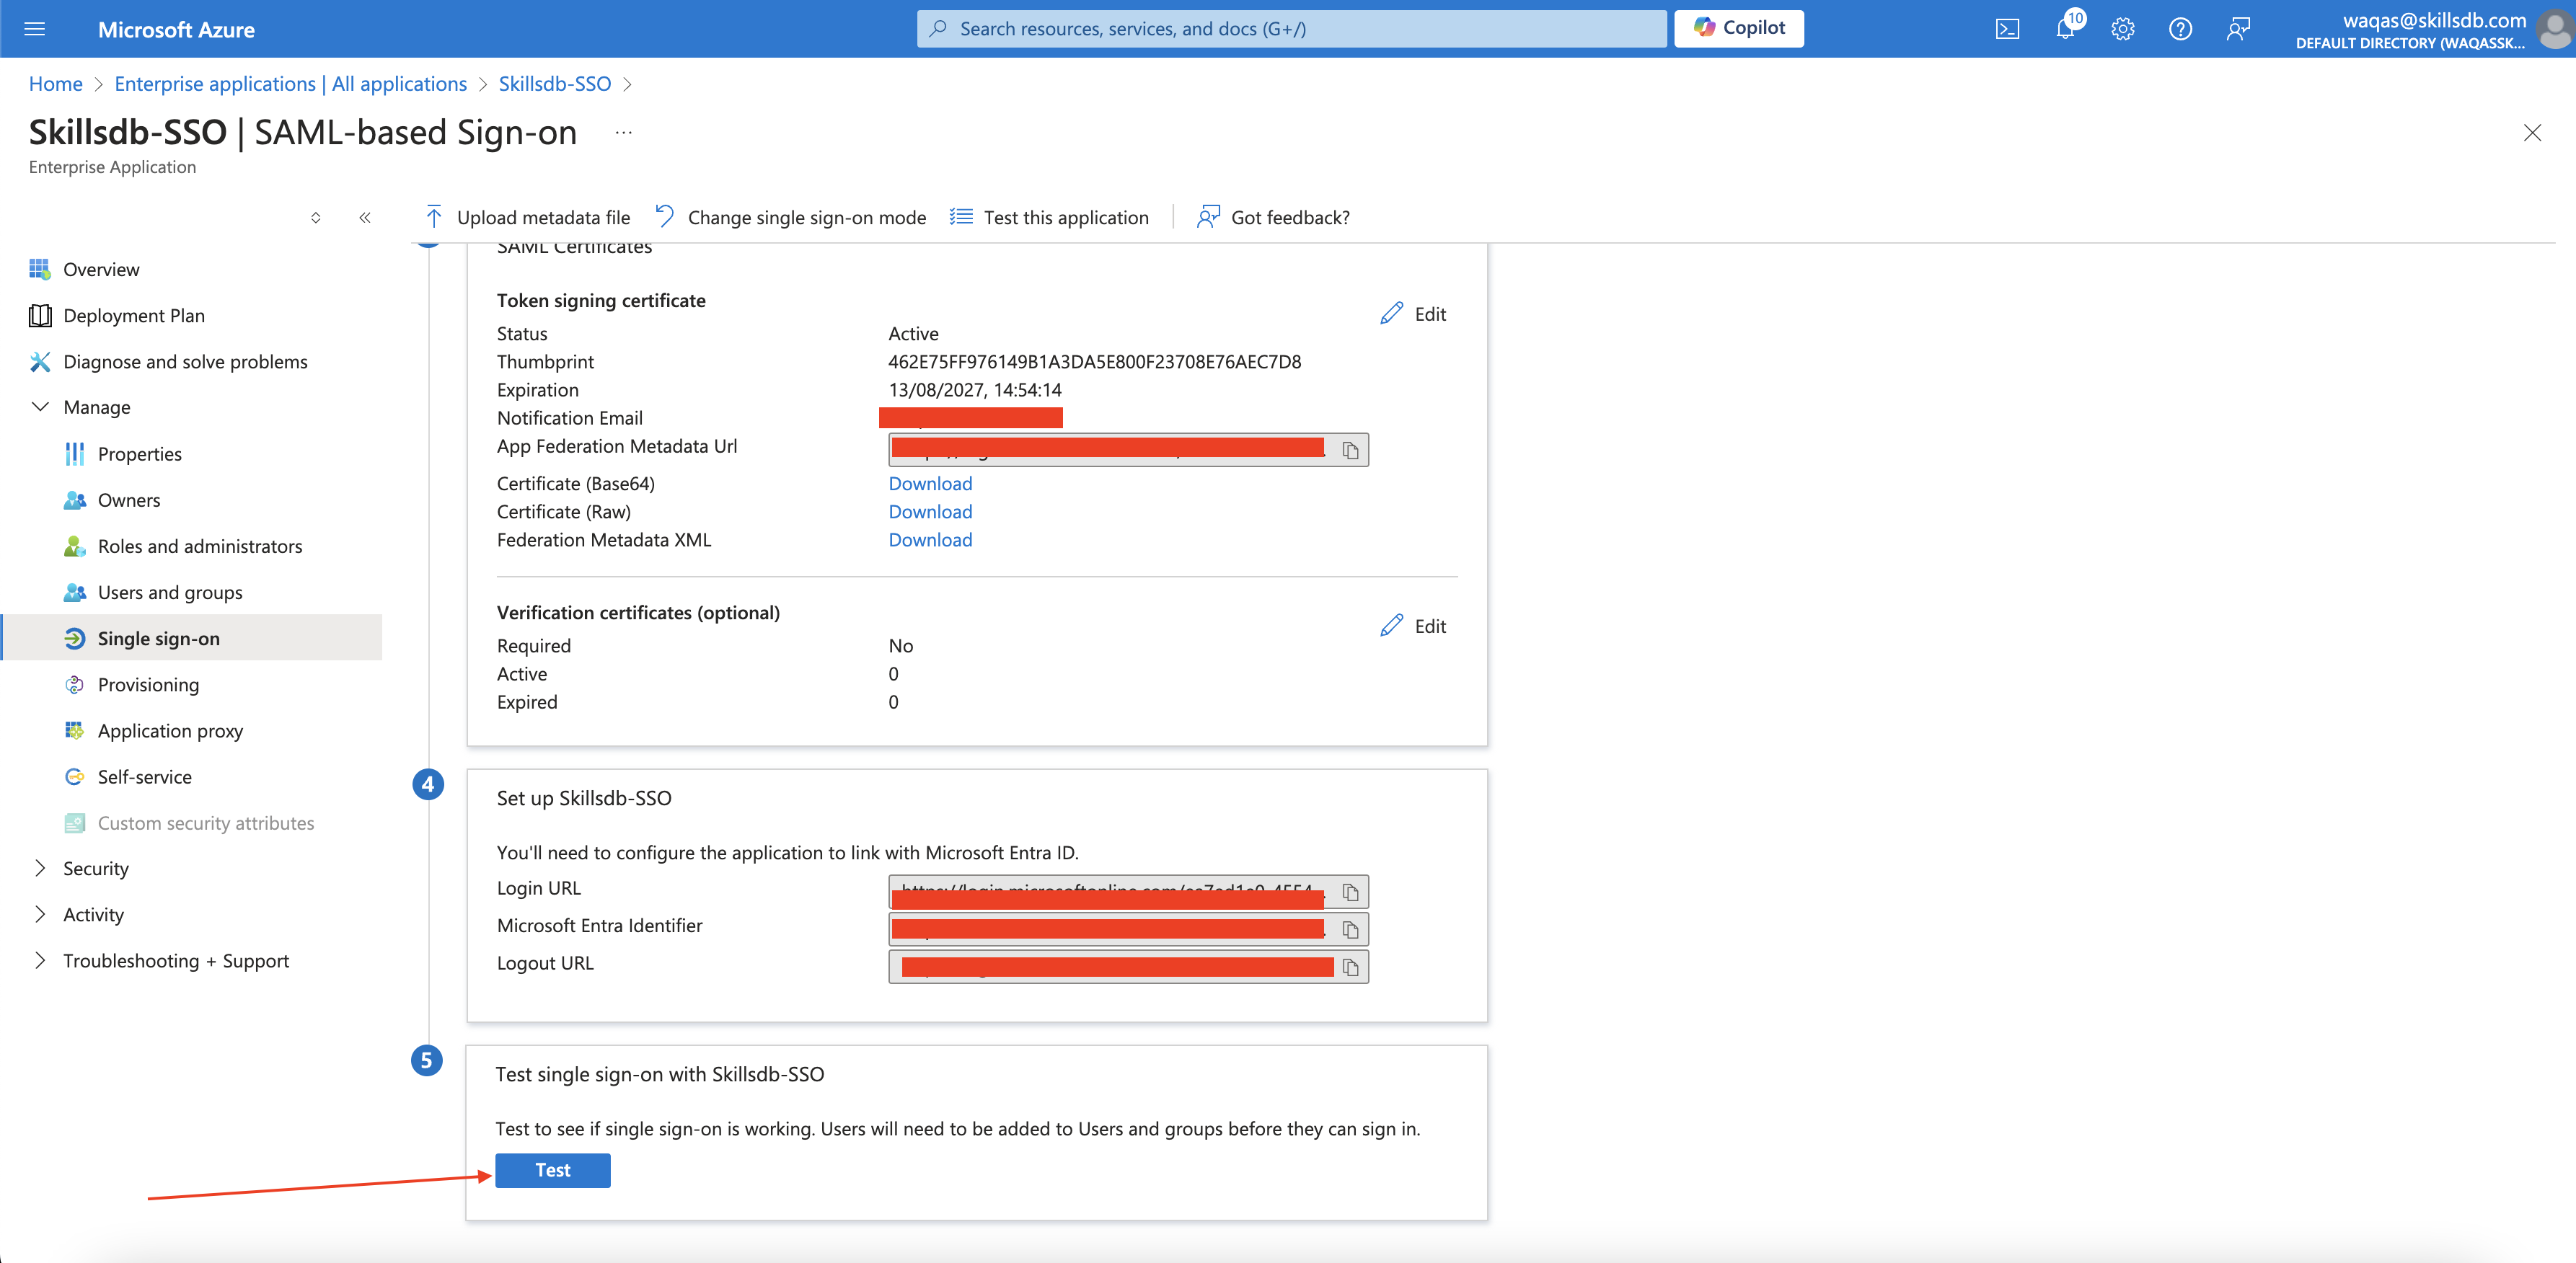
In all three flows, the user briefly sees an authenticating screen before landing in SkillsDB.

## Common Questions
No, SSO works independently. Without SCIM, a SkillsDB administrator must create, update, and deactivate user accounts manually — even though those users sign in through Entra. With SCIM, account lifecycle is automated. Most customers configure both. See [SCIM Setup](/identity-and-provisioning/scim-setup) for the provisioning side.
SkillsDB delegates the SAML 2.0 protocol to Stytch — its authentication and identity platform. This means SkillsDB does not host its own SAML endpoint. Customers configure their identity provider against the Stytch URLs that SkillsDB Support provides, and Stytch forwards verified sign-in events to SkillsDB.
Yes. Send the metadata URL to SkillsDB Support and request that they switch your configuration. Once they update the Stytch connection, the previous x509 certificate stops being used. There is no downtime for users during the swap.
The sign-in fails because SSO authenticates existing users — it does not create them. Either invite the user manually in SkillsDB, or configure [SCIM provisioning](/identity-and-provisioning/scim-setup) so that adding the user to the enterprise application automatically creates their SkillsDB account.
First, confirm that the user is assigned to the enterprise application under **Users and groups**. Next, verify the three SAML claims (`NameID`, `firstName`, `lastName`) are present and that `NameID` resolves to the user's email. If both are correct and the issue persists, contact [SkillsDB Support](https://www.skillsdb.com/support) with the timestamp of the failed attempt so they can review the SSO logs in Stytch.
Yes. Add custom claims to **Attributes & Claims** in the enterprise application — for example, `Department` or `JobTitle` — and notify SkillsDB Support of the exact claim **Names**. SkillsDB Support extends the mapping in Stytch so the additional values flow through on each sign-in.
Test environments use `https://test.stytch.com/*` instead of `https://login.skillsdb.com/*` for the Identifier, Reply URL, and Sign on URL. SkillsDB Support sends the correct values for your environment in the SAML endpoint file.
## Related Articles
How SSO and SCIM fit together in the SkillsDB identity model.
Automate user account creation, updates, and deactivation alongside SSO.
The end-user view of signing in to SkillsDB with SSO.
Known Entra limitations that affect SCIM provisioning, with workarounds.
## Need More Help?
If you run into issues during setup, reach out to your organization's SkillsDB administrator or contact [SkillsDB Support](https://www.skillsdb.com/support).